Monday, March 16, 2009

Chocolate Cupcakes with Mint White Chocolate Ganache


My tribute to St Patrick's Day and a bad day treat for myself. Not bad huh?


This is a moist delicious chocolate cake made with brown sugar and sour cream. It has a rich chocolate goodness that is awesome.


I decided to icing these cupcakes with a silky mint white chocolate ganache. Now we are talking pure decadent pleasure. I enjoyed every mouthful!


I made the ganache and then divided it and made half of it green in a tribute to St Patrick's Day. This is a rich ganache; almost truffle like, so a little goes a long way. You can lighten it up if you choose but I was going for the full works! There are loads of ganache recipes; the one that follows is more the ratio for truffles. I use this when decorating with ganache or when decadence is called for.


These are wonderful for any occasion. The ganache can be colored to fit any occasion or simply left its natural color. These are delightful with the white ganache and sprinkled with crushed starlight mints. Make some for your favorite occasion; chocolate and mint...how can you go wrong?


I have the recipe ingredients below as originally written; I only changed up the mixing steps. I always omit the coffee granules when making this cake but add them in if you like coffee flavor in your cakes. I confess that I can not tolerate anything coffee and sweet related. I love coffee and sugar but can't handle the two together. I never waste my efforts making any dessert that has coffee flavor in it. That's my quirk, so I've put it in the recipe for those that enjoy it.


Decadent Chocolate Cake adapted from Wilton
  • 3 squares (1 oz each) unsweetened chocolate, chopped
  • 3 tablespoons cocoa powder
  • 1 tablespoon instant coffee granules
  • 1 1/2 cups hot water
  • 3/4 cups sour cream
  • 3 cups all purpose flour
  • 2 teaspoons baking soda
  • 1/2 teaspoon salt
  • 3/4 cup (1 1/2 sticks) butter, softened
  • 2 cups firmly packed brown sugar
  • 1/2 cup granulated sugar
  • 3 eggs (room temperature)
  • 2 teaspoons vanilla extract

Preheat oven to 35o degrees. Grease and flour pans if not using cupcake liners.

In a small microwave-safe bowl, melt unsweetened chocolate; set aside to cool. In a medium bowl, dissolve the cocoa powder and coffee (if using) in hot water; stir well. Stir in sour cream and salt, set aside. I medium bowl combine flour and soda; whisk well and set aside.


In large bowl, beat butter until light and fluffy; add sugar and beat again till combined and fluffy. Stir in vanilla and mix thoroughly. Add eggs; one at a time, mixing just until yellow disappears. Do not over beat at this point. Next, add melted chocolate and blend well; scraping bowl well. Add half of flour mixture and add a small portion of the sour cream mixture; just enough to make the flour mix in well. Now add rest of flour and stir just until combined. Add remaining liquid and stir until combined. Do not overmix your cake at this point.

Divide batter among pans. Bake layers at 35-42 minutes; start checking at 30 minutes. if making cupcakes start checking them at 15 minutes and may take up to 20 minutes.

Cool in pan 10 minutes; remove from pan and cool completely.


Mint White Chocolate Ganache

  • 1 cup heavy cream
  • 16 ounces good quality white chocolate , chopped
  • 3 tablespoons butter (optional but good)
  • 2 teaspoon peppermint extract
Place chopped chocolate in a mixing bowl. Heat cream and butter (if using) till almost to the boiling point. Remove cream from heat and stir in extract until combined. Pour hot cream mixture over chopped chocolate. Stir until all the chocolate is melted and thoroughly combined; at this point stir in any food coloring if using and stir to combine. Cover and let the mixture cool to room temperature. When mixture is cool put in mixer and whip until light and fluffy. This will not double in volume but will be fluffy for cupcakes. If using as a piping; you can skip whipping it. Icing cupcakes as desired.

Tips:

  • The ganache can be made on its own, chilled, no need to whip and rolled into truffles and decorated as desired. Yum!
  • This is a heavier ganache version made for use on cupcakes as shown. If you wish to icing a cake or would like a much thicker icing on your cakes I would double the cream and half the chocolate for a light fluffy version. This version is less dense but still very tasty.
  • Omit the mint extract and use on a cake of your choice.
  • This recipe works equally well with semi-sweet chocolate. Have fun...make it yours.


These were so delicious; I couldn't get the photographer to leave them alone. I hope you enjoy!


I'm glad you're here, pull up a chair and sit a spell.

Mountain Belle


This post is being linked to:

Tempt My Tummy Tuesday at Blessed With Grace


Saturday, March 14, 2009

Corned Beef and Cabbage Pizza

It's that time of year when we start thinking of St Patrick's day and all things Irish. I came across this pizza recipe on Food Network and thought I would give it a try. It had corned beef, cabbage and potatoes; it fit in with St Patrick's and sounded good to me. Here's my version and opinions on this recipe.

I have a houseful of teens most of the time and of course they all love pizza. My husband is not that crazy about pizza; he mostly objects to the pizza sauce. I have never been able to get many dishes past my family that involved cooked cabbage; this pizza was a challenge. It has no tomatoes but plenty of cabbage and I decided to put it to the test. I did load it up with extra cheese as you can tell by the photo; my crew loves cheese.

I had made plans to make this pizza but my day started to fall apart pretty quickly; so, I cheated and used store bought crusts. That's a whole wheat crust in the pictures, I didn't really burn it!

I will post the recipe as I originally found it but this recipe does need some modifications. This is one of the few ways I have managed to get cabbage by my crew; with summer coming and lots of fresh cabbage soon to be available I will try this again but make some changes. We love to use the grill in the summer to make pizzas, I'll try this again on the grill. It has redeeming qualities but needs a boost. I will post the suggestions I think it needs at the end of the recipe. I also think this recipe will be a great way to dress up some leftovers; it does have possibilities.


Corned Beef and Cabbage Pizza from Food Network

  • Crusts for 2 pizzas (your favorite dough or pre-made crust)
  • 5 tablespoons extra virgin olive oil, plue more for the pan
  • 3 sliced green cabbage
  • kosher salt
  • 1 teaspoon pickling spices, tied securely in cheesecloth
  • 1 large potato, peeled and thinly sliced
  • freshly ground pepper
  • 2 cups shredded mozerella cheese
  • 3/4 cup monterey jack cheese
  • 1/2 cup grated parmesan cheese
  • 6 ounces slice corned beef

Heat 1 T olive oil in a skillet over medium-high heat. Add the cabbage, season with salt and and cook until just soft, about 5 minutes. Add the pickling spices and just enough water to cover. Simmer over low heat, covered, until the cabbage is tender, about 20 minutes. Drain the cabbage and set aside; discard the spices.

Place a pizza stone in the oven, if you have one, and preheat to 500 degrees. Toss potatoes with 2 T olive oil and season with salt and pepper. Roast in a single layer on a baking sheet until golden, about 15 minutes.

Place a pizza dough round on a pizza peel (if using stone) or on an oiled pizza pan; drizzle with 2 T olive oil. Scatter half of each of the cheeses, corned beef, cabbage and potatoes on crust. Season with salt and pepper. Carefully slip the pizza onto the hot stone, if using, or place pan in the oven. Cook until golden and crispy, 10-15 minutes. Repeat with remaining pizza crust/dough and toppings.


Tips/suggestions:

  • Personally I did not find that the potatoes added that much to the pizza. In the future if I have some leftover potatoes in the fridge I may toss them on but I will not go to the effort of peeling and roasting them just for this pizza; not enough of a flavor boost for the trouble.
  • This could be made with the canned corned beef to make it a little more economical. Also, if you have some leftover corned beef roast, chop the leftovers for this pizza.
  • I think it needs some onions added to it for a nice flavor boost. I will add these next time.
  • I think some russian or thousand island dressing would add a nice flavor also; kinda of add a reuben sandwich flavor to the pizza.
  • If you have a tea ball, they work great instead of cheesecloth for the pickling spices.
  • If you are a fan of caraway seeds, I think a few tossed on the pizza would be a pleasant addition.
  • I was in a hurry and did not make homemade dough and I was out of my stash of homemade crusts in the freezer. I think homemade dough would have been better.


I think this has some serious potential with the right kind of changes. Let me know what you come up with.


I'm glad you're here, pull up a chair and sit a spell.

Mountain Belle


Thursday, March 12, 2009

Mock French Cassoulet


This is always a big hit at our house and I usually don't have leftovers. It doesn't photograph like a star but it is one at our house. I hope you enjoy it as much as my family does.


Have you ever tried a recipe, really loved it and then....promptly lost it? I sure hope I'm not the only one that ever does this.


I originally made a dish similar to this over 15 years ago. We really liked it but the original recipe disappeared. Recipe thief? Since we enjoyed it so much I searched for a copy of the original or a similar one but never found what I was looking for.


This recipe is what finally came about as I played around over the years; I could remember some of the ingredient but no quantities. I tweaked, added and adjusted till I came up with my own version. It was never written down, it always just hung out in the back of my mind. Scary huh? I finally wrote it down so I could share it with you.


This recipe originally started out as a quick version of a French cassoulet. This dish is my speedy rendition of a long lost French cassoulet recipe. The original cassoulets involved a long cooking time, beans and quite a few varieties of meats; this is the busy cook version. I only using 2 varieties of meat and neither one of those are totally true to the original.


There are many recipes for cassoulets and some do contain tomatoes; I have totally crossed the line away from authentic but not from taste. This dish combines the proteins of beans and allows a smaller amount of meat to be used which also makes this a budget friendly dish.We're going to speed up cassoulet cooking; and that's why I call it a mock cassoulet.


This dish is a great change of pace from the usual pasta dish. It's got a sweet/tart taste that is a pleasing contrast with the mild taste of the beans. I hope you enjoy.


Mock French Cassoulet


1 - 12 oz package of bacon, cooked and diced; reserve 2 T of drippings

1 lb of chicken breast, cut into 1" chunks

1 medium onion, diced

1 teaspoon dried Thyme or 1 T fresh

2 tablespoons brown sugar

4 tablespoons cider vinegar

2 - 14.5 oz cans petite diced tomatoes

2 cups chicken broth

1/4 to 1/2 teaspoon garlic powder or several fresh cloves, minced

1 bay leaf (optional)

2 - 14.5 oz cans of cannellini or great northern beans


Heat a skillet over medium heat, add the 2 teaspoons of reserved bacon drippings. Put in the diced chicken and onion in the skillet and cook until the chicken is almost cooked through; stirring frequently. If using fresh garlic add it when chicken is halfway done.


While chicken is cooking put the white beans in a sauce pan to heat through.


When chicken is almost done add all of the remaining ingredients to the skillet. Bring the mixture to a boil and reduce to a simmer. Simmer till reduced to sauce consistency; about 20-30 minutes. When desired consistency is reached, remove the bay leaf and stir in the bacon.


To serve: Place a serving of white beans in a bowl or on a plate and top with the chicken mixture and serve.


Yield: approximately 6 servings.


Tips:

  • I frequently cook my own dried beans for this dish.
  • This can be sped up a great deal by precooking bacon ahead of time or using precooked frozen bacon. I tend to keep frozen bacon in my freezer and some bacon drippings in the fridge for emergencies.
  • Don't forget the frozen chicken bits to help speed the process. They can be tossed in the pan frozen and will be cooked through by the time the dish has finished simmering.
  • If you need to get this dish ready at warp speed you can speed the process by omitting the chicken broth and using chicken bouillon / base required for 2 cups liquid and only adding water if needed to achieve desired consistency; this will allow you to reduce simmering time. It's nice to have the simmer time but you can hurry it along this way when pressed for time.
  • This can also be served over mashed potatoes if you prefer those to beans.
  • This dish freezes wonderfully.
  • Change the meats up; instead of bacon use ham, sausage, kielbasa, or pancetta. Live it up a bit.


Play around with it and enjoy.


I'm glad you're here, pull up a chair and sit a spell.

Mountain Belle


Thursday, March 5, 2009

Orange Pineapple Marmalade


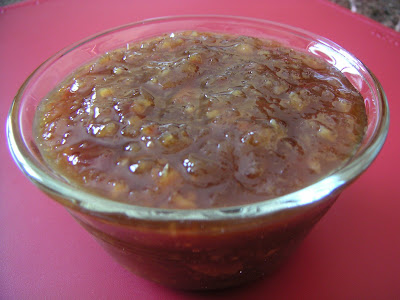
I think of marmalade as edible sunshine!


This is a spin on traditional marmalade. It's a citrusy blend of oranges, lemons, pineapple and cherries. This is wonderful on toast, biscuits and in your favorite recipes.

Frequently, this time of year good sales can be found on citrus fruits and that makes this the perfect time to make marmalade. There's something special about making this during this time of year; it's still cold and dreary outside and this reminds me that spring really is around the corner.


Orange Pineapple Marmalade from "The Ultimate Southern Living Cookbook"

3 medium oranges
1 medium lemon
1 (20 ounce) can crushed unsweetened pineapple, drained
6 3/4 cups sugar
1/2 hot water
1 (6 ounce) jar maraschino cherries, drained and chopped *

Wash oranges and lemons; cut into quarters. Remove seeds and membrane from each piece. Grind unpeeled oranges and lemons in a food processor or a meat grinder.

Combine ground citrus, pineapple, sugar and water in a Dutch oven; bring to a boil over high heat. Reduce heat; simmer 30 minutes, uncovered; stirring often. Remove from heat; stir in cherries.

Pour hot mixture into hot sterilized jars, filling to 1/4" from top. Remove air bubbles and wipe jar rims. Cover at once with metal lids and screw on bands. Process in boiling water bath 5 minutes. Yield: 8 half-pints.

* The maraschino cherries up the sweetness level but sometimes I like my marmalade a little tarter. This time I substituted chopped dried cherries for the maraschino cherries and cooked them with the other fruits to soften them up. Pick your sweetness level and eat it up. The dried cherries will give a little darker look and the maraschino will "pink" it up a bit, both are tasty.


Now you have a nice supply for yourself or a special gift for a fellow marmalade lover.


Remember the English muffin bread? Ah, here they both are together. I
love it when a plan comes together!


I'm glad you're here, pull up a chair and sit a spell.

Mountain Belle


Tuesday, March 3, 2009

English Muffin Bread


This is a wonderful bread you are sure to enjoy.


A friend gave me this recipe almost 30 years ago. I have been making this so long that I have actually made hundreds of loaves of this bread. I have made this bread for family, friends and have even honored requests for orders on occasion. This bread has never failed to be enjoyed.

This bread is like an English Muffin except in loaf form. It is best served toasted and enjoyed just like an English muffin. We enjoy this for breakfast and sandwiches.

This recipe makes 2 loaves. You can divide the recipe if you wish to only make one loaf but it freezes so well that I go ahead and make both loaves while I am already making a mess.

This dough is not quite like other bread doughs; actually it can be a sticky mess. Let's walk through the process and some of the tricks I've picked up from making this so many times.

The first step is to thoroughly grease 2 bread pans and dust them with a coating of cornmeal. This gives that light cornmeal dusting on the outside just like you find on a traditional English muffin. This is a matter of preference and I have been known to skip the cornmeal; make your own call here. This batch was made with the cornmeal dusting. Now, sit the pans aside to await the bread dough.

You're going to want your mixer for this recipe, so get it out. Even though this is a "bread" dough please put the paddle attachment on and not the dough hook. This bread does not require the kneading that some bread doughs require but does need thorough mixing in the beginning; so stick with the paddle.

Measure 3 cups of flour and set aside for later addition.

Now into the mixer bowl add: 3 cups flour, 2 T dry yeast, 1 T sugar, 2 t salt and 1/4 t baking soda. Now mix this for a minute to completely combine all dry ingredients.

I recommend a thermometer for this step. Measure 2 cups of milk and 1 cup of water into a microwave safe container. Since microwaves vary a lot, heat milk for 1 minute and then check again in 15 sec intervals. You want to heat the milk and water to a temperature of 120 to 130 F. We are adding this directly to dry ingredients instead of to yeast only, so it needs to be a few degrees warmer than lukewarm. Use a thermometer for best results. If you overheat it, then let it cool down slightly before adding to dry ingredients.

Once liquids are at proper temperature add them to the dry ingredients in the mixer and mix thoroughly. Once this is mixed completely, begin adding the reserved flour. You will need between 2 1/2 cups to the full 3 cups measured out. Mix only until the flour is incorporated, this bread does not need a lot of kneading.


This will make a stiff sticky dough and look something like this when mixing is complete.

Time to put the dough in the pans. For this next step get a sturdy spatula and give it a good spray with some cooking spray; trust me on this one. This dough is stiff and sticky and will try to stick to everything. Use the greased spatula and divide the dough evenly among the 2 bread pans. Take the greased spatula and gently press and smooth out the dough into the bread pans.
It will look uneven...and frankly...not very pretty. That's ok, it will straighten itself out. Set the pans in a warm place and cover. Let the dough rise for about 45 minutes.


When it has finished rising it will look something like this. See, those ugly wrinkles worked out.

Put the loaves into a 400F oven for about 25 minutes.


The loaf will look like this when done. Remove from pan and place on a rack to cool.


After being removed from pan you can see that nice dusting of cornmeal. Let cool completely.


It's now ready to toast and enjoy.


English Muffin Bread


5 1/2 - 6 cups all purpose flour
2 tablespoons dry yeast
1 tablespoon sugar
2 teaspoon salt
1/4 teaspoon baking soda
2 cups milk
1 cup water
Cornmeal, for dusting pans

Grease 2 bread pans, dust with cornmeal and set aside.

Measure 3 cups of flour and set aside for later. Into mixing bowl measure: 3 cups flour, yeast, sugar, salt and baking soda. Mix the dry ingredients on low speed until thoroughly combined.

Heat milk and water in microwave until 120 - 130 F. Add liquids to dry ingredients in mixer and mix until thoroughly combined. After combined, add 2 1/2 to full 3 cups flour of reserved flour; add enough to make a stiff batter.

Cover and let rise in a warm place for about 45 minutes. *

Bake at 400F for 25 minutes. remove from pans immediately and cool.

If freezing this bread I recommend slicing it first. This way you can pop one slice at a time in the toaster without having to thaw an entire loaf.


*The earlier picture of nicely risen dough is when all things go well. When the temperature and humidity are just right, this bread can rise like a freight train. Keep an eye on it while it is rising, it may be finished before the 45 minutes are up.

What happens if you forget to watch it? Well, it tries to crawl out of the pan and looks like a science project gone bad. Don't ask me how I know this. If life gets in the way and this happens to you here are a few things you can do to salvage the bread. Do NOT attempt to punch it down and get it back into the pan. Now, get a sharp pair of kitchen shears and trim what has tried to escape. Shape the loaf back up with the shears as best you can. The loaf will be smaller and not as perfect texture but it sure beats throwing your hard work away. It will still be tasty, just not perfect. I hope you enjoy!

I'm glad you're here, pull up a chair and sit a spell.

Mountain Belle

Sunday, March 1, 2009

Southen Pecan Brownies


This is my favorite brownie recipe. Luckily I don’t make them very often because I could eat them all! Brownies are a popular treat with most everyone and these are pure decadence. They are really that good! I have made these with and without the nuts and both versions have been equally delicious. I do recommend that you don't skip toasting the nuts, it's well worth the extra step.

I have used milk, semi-sweet and white chocolate chips / chunks and they all turn out great.

These brownies are dense, chewy and full of rich chocolate flavor. Although I have changed a few things but I change the butter. I have to agree with Paula on this one; butter does make it better. These don’t last long around here.


Southern Pecan Brownies adapted from from “Cooking with Paula Deen”

1 1/2 c butter (3 sticks)

5 (1 ounce) squares unsweetened chocolate

2 1/2 c sugar

6 large eggs

2 c all-purpose flour

1/2 teaspoon salt

1 teaspoon vanilla extract

1 c milk chocolate morsels

1 c toasted chopped pecans

Confectioners sugar (optional)


Preheat oven to 350 F. Grease a 13x9x2 baking pan or line with heavy duty aluminum foil and lightly grease the foil. The foil aides in removing brownies and makes clean up easier.

In a medium microwave-safe bowl, combine butter and unsweetend chocolate. Microwave on high in 30 second intervals, stirring after each, until butter and chocolate are melted and smooth, about 2 minutes. Set aside to cool.

In mixer bowl, beat sugar and eggs at high speed until fluffy. Beating the eggs will give you that shiny crusty brownie crust we are familiar with. If you don't want the crust, then skip the mixer. Instead gently stir the eggs until mixed and then add sugar; stirring just until blended. This will give a softer finished crust. *

Gradually stir in cooled chocolate mixture.

Add salt and vanilla and stir well. Gradually beat in flour and stir just until flour is mixed through. Do not over mix. Stir in pecans and chocolate morsels.

Pour into prepared pan and bake 35-38 minutes or until center is firm.

Once cool, lift brownies from pan using foil as handles. Dust with confectioners sugar if desired.


Tip: When trying to cut fresh warm brownies, the best knife to use is a plastic knife. This will help keep the brownies from crumbling and tearing while you cut them. I know it sounds strange but trust me, it works. I keep one in my baking drawer for just such special occasions.

* This is a great tip I learned from the famous cookbook author and writer Shirley Corriher. I love her books "Cookwise" and "Bakewise".


I'm glad you're here, pull up a chair and sit a spell.

Mountain Belle


This post is being linked to:

Tempt My Tummy Tuesday at Blessed With Grace